How to Revive a Lawn: Bringing Your Drought-Stricken Lawn Back to Life
1. Assessing Your Lawn’s Health: Is It Sleeping or Beyond Saving?

Understanding the state of your lawn is the first crucial step:
Dormant Grass: This grass is in survival mode, appearing brown or tan. It’s not dead, just taking a break. To test, gently tug on the grass. If it stays rooted, it’s just dormant. Healthy roots look firm and are a light color.
Dead Grass: If the grass comes out easily and is brittle, it’s time to say goodbye. Dead grass won’t revive, even with watering, so you’ll need to reseed or resod these areas.
Compacted Soil: This is a common issue in drought-affected lawns. Compacted soil can’t absorb water well, leading to runoff. It also restricts air flow and nutrient absorption, making it hard for grass roots to grow.
2. Soil Preparation: Setting the Stage for Growth
Healthy soil is the foundation of a lush lawn:
Aeration is Key: Aerating your soil is like giving it a mini-tillage. It creates small holes that allow air, water, and nutrients to penetrate to the grass roots, breaking up compacted soil and improving overall soil health.
The simplest way to aerate a lawn is by using a manual lawn aerator. There are two common types of manual aerators: spike aerators and plug (or core) aerators.
- Spike Aerators:
- These are tools with solid, spike-like tines that push into the soil, creating holes.
- How to Use: Simply push the aerator across the lawn, much like you would with a lawn mower. The spikes create holes in the soil as you go.
- Plug Aerators:
- These remove small cores or plugs of soil and grass from the lawn.
- How to Use: It works similarly to the spike aerator, but instead of just pushing into the soil, it removes small plugs of soil, which are then left on the surface to decompose.
Steps for Manual Aeration:
- Moisten the Lawn: It’s easier to aerate when the soil is moist but not soggy. Water your lawn lightly the day before aerating.
- Aerate the Lawn: Push the aerator over your lawn in a pattern that covers the area uniformly. Overlap paths for thorough coverage if needed.
- Leave Soil Plugs on the Lawn: If you’re using a plug aerator, leave the extracted soil plugs on the lawn to break down and redistribute the soil.
- Water After Aeration: Water your lawn after aeration to help control dust and assist in closing the holes.
Top Dressing for Extra Nourishment: Following aeration, a top dressing (like a mix of compost and soil) can be very beneficial. This adds vital nutrients back into the soil and introduces beneficial organisms that help break down organic matter, making nutrients more accessible to your grass.
| Grass Type | Recommended Top Dressing Type |
|---|---|
| Kentucky Bluegrass | Organic compost mixed with sand or topsoil |
| Perennial Ryegrass | Compost or a blend of compost and fine sand |
| Bermuda Grass | Sand, or a sand-compost mix |
| St. Augustine Grass | Well-decomposed compost or peat moss |
| Tall Fescue | Compost-rich mix, occasionally sand if needed |
| Buffalo Grass | Organic compost, peat, or a compost-sand mix |
| Zoysia Grass | Fine, sandy loam mixed with compost |
| Fine Fescue | Organic compost or a compost-topsoil blend |
The choice of top dressing depends on the soil type and the specific needs of the grass. Compost is generally beneficial for all grass types, improving its structure and nutrient content. Sand is often added to improve drainage, especially in clay soils. It’s important to apply the top dressing evenly and in the appropriate quantity to avoid smothering the grass.
3. Reseeding: Choosing the Right Grass
If dead patches are present, reseeding is your next move:
Selecting the Right Seed: Different grass types thrive in different climates. For example, Bermuda grass loves heat and is great for southern lawns, while Kentucky Bluegrass is perfect for cooler northern climates.
Reseeding Process: The best time to reseed depends on the grass type but is usually in the cooler months of early fall or spring. Ensure good seed-to-soil contact by gently raking the seeds into the topsoil and keep the soil moist to encourage germination.
Recommended Grass Types by Region
| Region | Grass Type | Characteristics | Best for Climate |
|---|---|---|---|
| Northeast | Kentucky Bluegrass | Fine texture, requires moderate maintenance | Cold winters, humid summers |
| Southeast | Bermuda Grass | Heat-tolerant, durable, needs full sun | Warm, humid |
| Midwest | Tall Fescue | Tolerates temperature extremes, low maintenance | Wide climate range |
| Southwest | Buffalo Grass | Drought-resistant, low maintenance | Hot, dry |
| West/Northwest | Perennial Ryegrass | Quick germination, fine texture | Mild, moist |
| Central Plains | Zoysia Grass | Heat and drought tolerant, dense growth | Varied, transitional |
| Mountain States | Fine Fescue | Shade-tolerant, low water requirement | Cooler, higher elevation |
| Gulf Coast | St. Augustine | Shade and heat tolerant, requires more water | Hot, humid, coastal |
4. Watering Wisely: The Art of Hydration
Proper watering can make or break your lawn’s recovery:
Measuring Water Output: Place containers around your lawn to measure how much water your sprinklers are putting out. You’re aiming for about 1 inch of water per week, including rainfall.
Adjusting to Rainfall: Use a rain gauge and adjust your watering accordingly. Overwatering can be as detrimental as underwatering.
5. Fertilization: Feeding Your Lawn Right
Different grass types have different appetites:
Tailored Fertilization: For instance, Bermuda grass requires high nitrogen fertilizer, while Fine Fescue prefers a more balanced, low-nitrogen diet. Adjust your fertilization based on your specific grass type and soil needs.
| Grass Type | Preferred Fertilization Composition |
|---|---|
| Kentucky Bluegrass | High nitrogen, especially in spring and fall. Balanced N-P-K (Nitrogen-Phosphorus-Potassium) formula. |
| Perennial Ryegrass | Balanced N-P-K formula with slightly higher nitrogen. Slow-release nitrogen is beneficial. |
| Bermuda Grass | High nitrogen fertilizer during growing season. Lower nitrogen in fall. |
| St. Augustine Grass | High nitrogen with iron supplementation for deep green color. |
| Tall Fescue | Balanced N-P-K formula, with emphasis on nitrogen. Slow-release formulas work well. |
| Buffalo Grass | Low nitrogen, as it’s naturally low maintenance and has lower nutrient requirements. |
| Zoysia Grass | High nitrogen, especially during active growth. Slow-release nitrogen formulas are ideal. |
| Fine Fescue | Low to moderate nitrogen. Use a balanced N-P-K formula, especially in fall and spring. |
6. Maintenance: The Ongoing Care

Regular care is essential for a healthy lawn:
Proper Mowing: Mowing at a higher length encourages deeper root growth and retains more soil moisture. The ideal height varies by grass type.
| Grass Type | Optimal Mowing Length (inches) |
|---|---|
| Kentucky Bluegrass | 2.5 to 3.5 |
| Perennial Ryegrass | 2 to 3 |
| Bermuda Grass | 1 to 1.5 |
| St. Augustine Grass | 2.5 to 4 |
| Tall Fescue | 2 to 3 |
| Buffalo Grass | 2 to 3 |
| Zoysia Grass | 1 to 2 |
| Fine Fescue | 2.5 to 3.5 |
7. Drought Management: Long-Term Strategies

In areas prone to drought, long-term planning is crucial:
Water-Saving Landscaping: Consider xeriscaping, using native plants, and mulching to reduce water needs. Rainwater harvesting can also be a great way to use natural resources efficiently.
8. Monitoring and Adjusting: Stay Vigilant
Regular checks can help you spot issues like pest infestations or diseases early on. Common pests include grubs and chinch bugs, which need to be managed promptly to prevent serious damage.
Signs of Lawn Stress:
Color Changes: Grass turning yellow, blue-gray, or brown.
Footprints Remaining on Grass: If footprints or tire tracks don’t disappear quickly, it indicates dehydration.
Sparse or Bare Patches: These may indicate disease, pest problems, or soil issues.

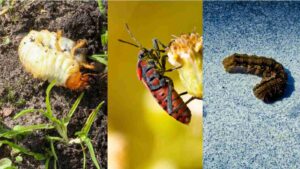
In order: Grubs, Chinch Bugs, Armyworms
Common Lawn Pests:
Grubs: White, C-shaped larvae that feed on grass roots, causing yellow patches. –
Chinch Bugs: Cause grass to turn yellow then brown; often found in hot, dry areas of the lawn.
Armyworms: Green or brown caterpillars that feed on grass blades, leaving bare spots. –
Pest Management:
Regular Inspections: Check for signs of pests regularly, especially in warmer months.
Proper Identification: Correctly identifying the pest is crucial for effective treatment.
Cultural Controls: Maintain a healthy lawn through proper mowing, watering, and fertilizing to reduce pest infestations.
Biological Controls: Use natural predators or beneficial nematodes where applicable.
Chemical Controls: If necessary, use targeted insecticides, following label instructions and local regulations.
9. Revival Timeline: Patience is Key
Early Stages (Weeks 1-4): Focus on aeration, watering, and addressing soil compaction. You might start seeing germination in reseeded areas.
Mid-Stage (Weeks 5-8): Continue your care routine and start to see more noticeable growth.
Later Stages (Weeks 9-12 and Beyond): With consistent care, your lawn should show significant improvement. Continue to adapt your routine based on your lawn’s response and the changing seasons.
Conclusion
In conclusion, reviving your drought-stricken lawn, while entirely achievable with the right care and dedication, can be a time-consuming and intricate process. It requires patience, a certain level of expertise, and consistent effort. For those who may find the task daunting or struggle with time constraints, hiring a professional landscaper is a practical and effective alternative. Professional landscapers bring a wealth of knowledge, specialized tools, and experience in lawn care, ensuring that your lawn not only recovers but thrives. They can tailor a care plan specific to your lawn’s needs, handle the intricacies of lawn maintenance, and provide ongoing support and advice. So, if you’re seeking a beautiful, lush lawn without the stress and time investment, turning to a skilled professional could be the perfect solution for your lawn care needs. Get your free quote now!
As an Amazon Associate, we earn from qualifying purchases. Affiliate links help support our work and allow us to continue providing free content. If you make a purchase through an affiliate link, we receive a small percentage of the sale at no extra cost to you.
The DIY repair advice on this site is for informational purposes only. The content aims to be helpful but cannot guarantee success or substitute professional advice. Any repairs involve some risk, so readers assume all liability and responsibility for their actions. Safety should be the top priority. If unsure about any procedure, first consult a qualified professional to determine suitability.
- Sprinkler Rebate Guide
- Slash Your Water Bill and Save the Planet with Sprinkler Rain Sensors!
- How to Revive a Lawn: Bringing Your Drought-Stricken Lawn Back to Life
- Sprinkler Repair Costs: The Shocking Truths You Need to Know!
- Gardeners Won’t Believe These Raised Bed Irrigation System Hacks!
- 11 Shocking Secrets to Buying the Perfect Sprinkler Heads
- A Comprehensive Guide on How to Adjust the Rainbird 5000 Sprinkler Head
- The Complete Step-by-Step Guide to Design a Sprinkler System
- Residential Sprinkler Head Types: A Comprehensive Guide
- Thank You For Subscribing


